I’m going to share a brief history of my experience with Fitzgerald’s (the live music club in Houston). Partly as an exercise in capturing some memories, but also to show how seemingly minor things can have effects over a lifetime.
It starts Friday, Feb 16, 1990. A high school friend of ours, Chris King, was playing bass for the band Panjandrum. That night they were playing with the Dallas/Denton band Ten Hands at Fitz. This was the first ever live, local band club I had ever been to. At Zelda’s that night was the first time the Austin rap/rock band Retarted Elf played in Houston (at least at Fitz)… and that was a crazy show as well. But upstairs, I was transfixed. Ten Hands, to this day, is one of my favorite bands. And BOTH bands demonstrated how you can have top-notch musical ability, catchy songs, and just have FUN.
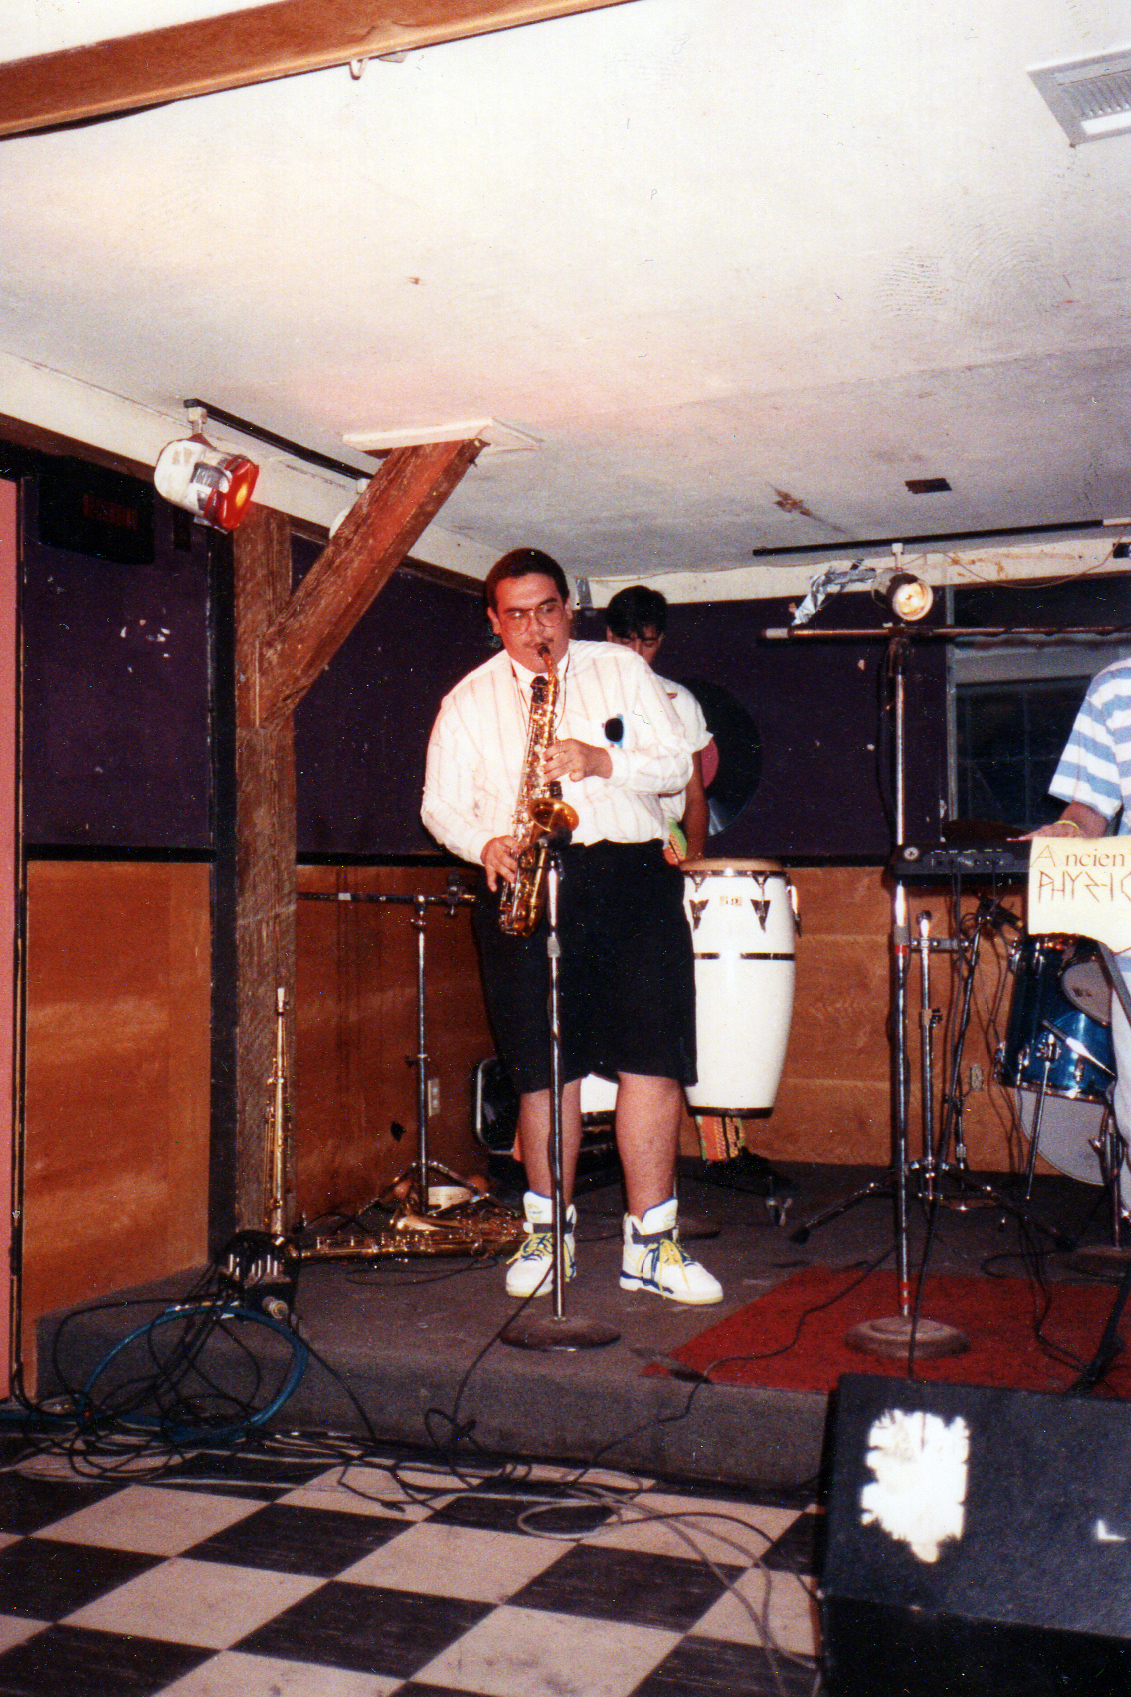
This might be apocryphal, but I seem to remember picking up a Fitzherald paper that night, and seeing it mention “Breakin’ Out” nights at Zelda’s. Then talking about starting a band with my friend Dave. We were part of our high school jazz band (which was how we knew Chris King), and recruited others in the band to join us. At that point, we didn’t have any songs, but came up with the name “Ancient Phyz-ics”. I don’t recall the specifics about how that name came about, but I think there was discussion about having weird spelling and punctuation to make it stand out. At that point, one of us called Fitz to see about getting in on a Breakin’ Out night… and found out we needed to pay $50, and would get $1 back for each person we brought in who used a ticket they gave us, up to $50. Dave and I went up to the Fitz office (at that time it was a separate building at the back), paid the $50, got scheduled for Monday April 9, and got a stack of labels and tickets. It’s quite possible we still didn’t have any songs at this point, or maybe we had a couple of ideas but nothing finalized.

Luckily, April 9 was during spring break, so we were able to get a bunch of friends out to the show, and made back the $50. We also got scheduled for another Breakin’ Out night the next month, but WITHOUT having to pay the $50 upfront, and we could still get $1 per ticket up to $50. We played 4 shows in total, all at Zelda’s, and I know we added a bass player at some point, but he wasn’t from our school and I don’t recall how all that happened.
Back to Ten Hands
I probably went to every Fitz show they played up until I went to college. Plus, at the time, I was considering going to college as a music major. After reading about the members of Ten Hands having come out of the University of North Texas music school, I decided THAT was where I wanted to go. And when I actually spent my year at UNT, I saw Ten Hands many times in Denton and Dallas. I ended up hating UNT for myriad reasons, and came back to Houston to go to UofH.
After a couple more years as a music major, I realized that I enjoyed PLAYING music too much, and having to STUDY it zapped all the joy. Then I discovered Houston Community College’s Audio Recording Technology program, and enrolled for the Spring of 1995. I really enjoyed that program. At some point, my friend Clare had started working at Fitz and mentioned they were looking for someone to do sound at Zelda’s during week days. We met up in Austin at SXSW, coincidentally videoed by the Fitz soundman at the time, Keith, and on YouTube. That night, Clare introduced me to Chris Chaney, who was managing Fitz, and she told me to come in and start training in a couple of weeks.
My first few weeks were training with the guy who was doing sound at Zelda’s (I forget his name). The idea was that I would run weekdays at Zelda’s and he would run weekends, and fill in for Keith at Fitz on occasion. I also trained with Keith to act as a second backup.
Another tangent about how small things can have lasting effects: One evening while helping Keith before doors opened, he started playing a CD over the PA. I was instantly curious about who it was… and Keith said it was Nick Heyward and the CD, From Monday to Sunday. I ended up buying that CD, and have been a dedicated Heyward/Haircut 100 fan since. Heyward, and that particular album, have probably been in my Spotify Top 10 since Spotify started showing that.
The Zelda’s sound guy ended up going to work full-time sound at Emo’s (Houston) in the fall of ’95 and I took over doing weekends, as well as occasional weekdays at Fitz and filling in for Keith on weekends when needed. I’ve always been super introverted, so I doubt I made much of an impression on anyone, but I probably ran at least one show of the more popular bands during the few years I was there. One I particularly remember was getting scheduled for a 30 Foot Fall show, and already being a fan, I was scared of screwing things up and those random feedback frequencies that sometimes happened, and everyone getting pissed off at me. But it ended up being one of the most chill shows I did, and everyone was super nice. I think Bickley may have been on the bill? But even if not, I remember the lead singer of Bickley being super cool as well.
Let me share some thoughts on the various bands I remember. Understand that I get how the shows can be stressful and having things sound good for the audience is one of the most important things, and people handle that differently:
- Stroke 9: They ended up having a modest hit a few years later, but this weekday night, there were literally 5 non-staff people upstairs. But they were already super polished, and I enjoyed them. They even offered to end early so I could go home, and I told them I was there until close anyway, so happy for them to finish their set. Very cool guys, and even though Fitz always sounded better when more bodies were there, I think I got them sounding decent.
- Pushmonkey: Austin band. The singer was a jerk to me while setting up, then constantly complained about the monitors (I did my best). I didn’t enjoy that night.
- The Xenos: Prog, Zappa-esque band that should have been WAY more popular.
- Demise of Folly: Another small band that I personally enjoyed, and nice guys.
- King Friday: Austin band that I did sound for twice during weekday shows. The first time I was blown away, and they gave me a free CD (I always enjoyed free CDs). Super tight, with a super modern sound (in the mid 90s), and nice people. It was another sparsely populated show, but I think there were a couple of opening bands that stuck around, so it wasn’t totally empty. I was excited the second time I was on the schedule when they played, and think I got some of the cleanest sound with those guys. I thought they should’ve been more popular.
- Ska nights: I did a handful of these. It seemed for a couple years, every suburban high school marching band kid was in a ska band. These usually started around 6pm and there would be 6 or 7 bands (or more) playing, trying to wrap up before the midnight under-18 curfew. Most of the kids were fine, but the parents in the balcony, telling me how THEIR kid needed to be turned up… well. Then, those opening bands usually had 30 minutes, and most of the time I would give a “5 minutes / one more song” prompt and everything was fine… other times they were a bit more difficult. And I remember one band, where the drummer had his own mics, for every drum, that he wanted to use. I had to tell him there was literally no way to use them all and still be able to mic a horn line and multiple vocals and other instruments. I remember going home after these nights, trying to fall asleep, and hearing that “ska rhythm” in my head all night.
Let me do another tangent about local band CDs/recordings:
At one point in time, I had SO many CDs and cassettes from local bands. Some I listened to quite a bit. Sadly, over the years, they either degraded beyond repair, got lost, and many got destroyed after tropical storm Allison flooded my parents’ house. Today, trying to find them on the internet is basically impossible, and that saddens me. One particular CD was “Swill” from a band named “Wishbone Bush”, a funk/rap/rock band. There is basically zero reference that it even existed on the internet… nothing on Spotify/BandCamp/etc. I listened to this CD quite a bit, and now it’s basically vanished from existence. Then going back to Panjandrum, I had their tape/EP “Chuck” and listened to that so much… and also, there’s nothing about it online. With that in mind, I started https://houstonmusicarchive.com/ , with the goal of finding local Houston bands’ music and collecting it into a single place, admittedly focusing on 90s bands in the broader “rock” genre. I’ve been sourcing the material from various places: if the band has put their music online, I make sure to link to it… I’ve found random YouTube “videos” that are rips of CDs, and I’ll download the audio and save it… there are random websites that posted mp3s that I downloaded… and some are rips of music I still have, or happened to rip before. My ultimate idea is to have all the music downloaded and stored… somewhere (offline AND online)… so even if Bandcamp/Spotify shuts down, there will be an archive of it. Kind of like Rice’s Houston Folk Music archive but for rock music. So if you were in a band in the 80s/90s/00s that released an album, and would like it archived, let me know. Also, do you have a copy of Wishbone Bush’s Swill, or Panjandrum’s Chuck?
Going back to Fitzgerald’s:
One of the nights, I did sound for Taste of Garlic, and I guess they liked what I did, and they asked me to be their soundguy for other, non-Fitz shows. This would’ve been late 1995. I remember I even got them to be my Audio Recording class project for that Fall semester, and they came out and I recorded a few songs… once again, I fear those recordings have vanished. Also, nothing from their first full CD, other than a couple of tracks on their ReverbNation account. But that was a fun time getting to hang with those guys, watching them rehearse at Francisco Studio, and even doing sound at this huge rock club when they opened for Dread Zeppelin.
I think it was around late 95 that Jeremy started doing more sound shifts. When the other guy went to Emo’s, he took over weekdays at Zelda’s and we would swap between weekend shows and filling in for Keith upstairs. He also seemed to do just about everything at Fitz at some point, from the door to sound to bartending. I will say I didn’t really befriend many people during my time at Fitz – my introversion, among a bunch of extroverts, didn’t translate well. Jeremy was one of the few that I would’ve considered a “friend”. He even got me a few sound gigs at Emo’s, where he also worked. Also, there was a guy named Justin who ran the door and was a general helper, and he played in this band “Juxta”… he was super friendly, and I liked talking to him. I even recorded his band at HCC, and again, sadly, have lost those recordings.
Then there was Keith.
I found him very intimidating. He was cool and confident and wore a long trench coat and hat, and was not afraid to tell bands to get the hell off the stage. But the intimidation was all on me… he was always patient and pleasant to train with. This leads to another branch in my story: I was always interested in technology, starting with learning how to code BASIC on a Commodore Vic-20 in the 80s… and buying a 14.4 modem to connect to the internet in the early 90s. I don’t remember why, but I was over at Keith’s house and he had just started this web server company named Trinicom. At this point, the “web” was only a few years old, and I was amazed by the whole idea… and he explained how it all worked. Soon after that, I taught myself HTML and very basic web server tech. At that point, I still had dreams of either being a musician or recording engineer, but it laid a foundation that resulted in my last 25 years working in software engineering.
There are a few key Fitzgerald’s memories that have stuck with me:
- Charlie Sexton – I remember getting called to help with load-in for the show. He had his own PA and lights, and tons of gear… and a bunch of us were there early to haul this heavy stuff upstairs. After all that, I think there were maybe 100 people at the show, and he didn’t even do the one song that made him semi-famous.
- The Tragically Hip played one night, and I was scheduled to be general help. I had never heard of the band, and I thought I was fairly hip with cool, underground music. And the place was PACKED. Lines out to the parking lot. Apparently there was a contingent of Canadian ex-pats living in Houston, and ALL of them showed up.
- Fugazi – This was booked by Fitz, but they actually played at this hall in south Houston. A bunch of us were conscripted to be “security” for the show. I remember Jeremy handed me a Maglight and I just roamed the back of the hall and out to the parking lot. There was also something about it being Ian MacKaye’s birthday and having a hard time finding a vegan birthday cake.
I don’t remember all the dates, but at some point Chris Chaney left Fitzgerald’s and Robbie (a singer in one of the Houston bands) took over booking. Maybe there was someone else in between? Anyway, I had the feeling that Robbie didn’t like me for some reason. I don’t recall any specific incidents, but I would see him be friendly with other people and was NOT that way with me. I admit I’ve never had the most astute “emotional radar”, so it’s likely I misread that. But anyway, this would’ve been late 1997 and I noticed my schedule became VERY infrequent. In fact, I had started running the light board (a lesser-paying shift) more and more, and even THAT became infrequent. There would be two weeks of no shifts, then three, and by the end of 97, I just stopped getting scheduled for anything.
At that point, I had a part-time position at a radio station. Part of the HCC program was interning at a studio, but when I applied at various studios they had no space… so my advisor said I should try a radio station. I ended up being production intern at The Buzz, and then got a paid gig at KKBQ, eventually moving to full-time there. Later, I was working at Clear Channel and saw an internal job opening for an “Online Training Developer” and was able to get that job, which was the first programming gig I ever had… while I’ve had many jobs since, I’m still doing programming to this day.
It’s all connected.
My final Fitzgerald’s experience was in 2000, when the band I was in played Zelda’s (it had been converted to a bigger stage, and better sound, and called Fitz Downstairs at the time). My (eventual) wife took some pictures. And I think that was the last time I had been there. After that, I got married and we lived far south and didn’t do a whole lot in town. And I think the bands we were into at the time were all at Rudyard’s. We moved to Austin, and I remember seeing BC from ToG/Simpleton at Kerbey Lane Cafe… and he actually recognized me first. I was older and had gained weight, so at least I was somewhat still recognizable!
Currently, outside the Houston Music Archive, just for fun I started creating a Fitzgerald’s show archive: https://houstonmusicarchive.com/fitzgeralds/ … Most of the show info is from Houston Post and Chronicle newspaper listings. Some is from various concert flyers that have been posted. Rice has some Public News archives from 1982 and 83 that I was able to parse. Feel free to contact me if there’s anything wrong or missing. It’s still a work in progress, and I do regularly look up newspaper archives and flyers.